> ## Documentation Index
> Fetch the complete documentation index at: https://docs.vidocsecurity.com/llms.txt
> Use this file to discover all available pages before exploring further.
# Findings
> Examine the confirmed security issues of your repositories, change their status and severity, and send them to AI tools.
Findings needs the Enterprise plan on Vidoc Cloud. Included in self-hosted installations.
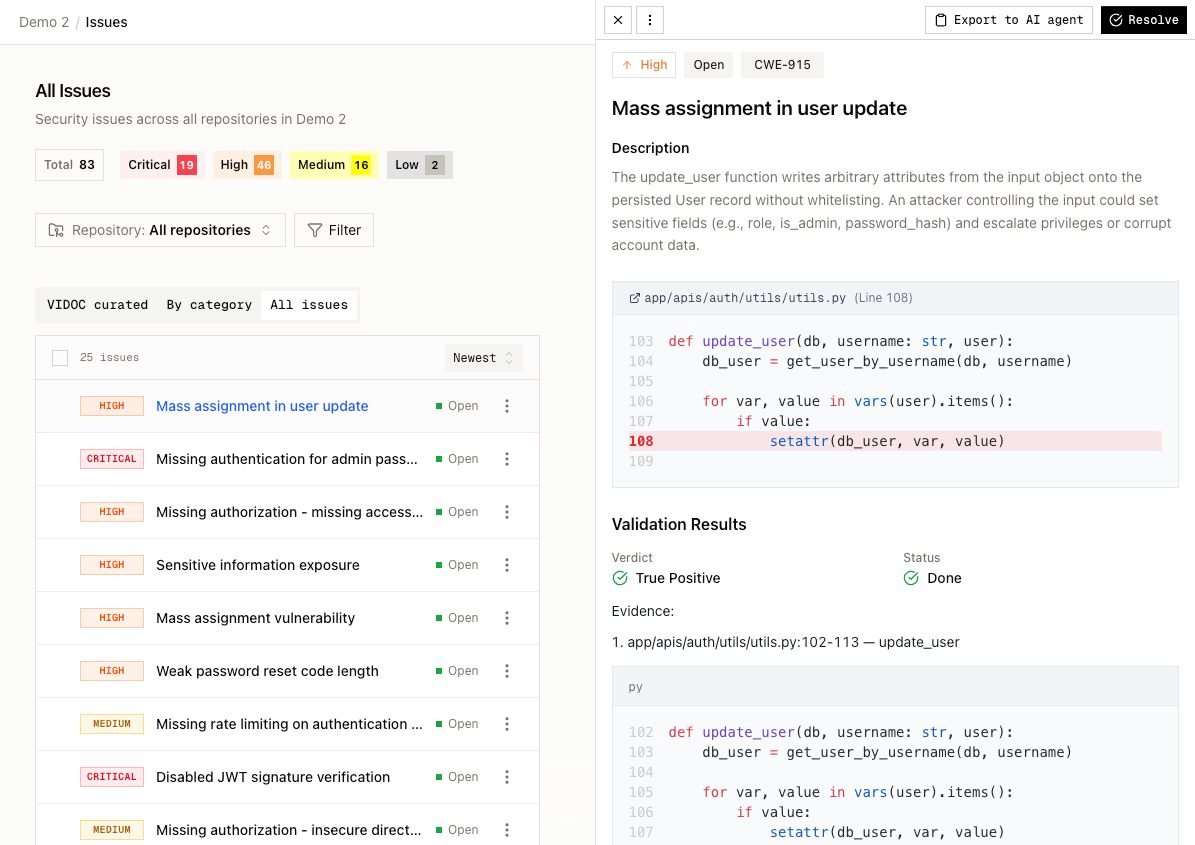
**Findings** shows the security issues on the source branches of all repositories in the current project. The source branch is usually the default branch. The findings of PR scans are on the [Pull requests](/web-app/pull-requests) page.
Vidoc shows only confirmed findings (validation verdict: true positive). For the reasons, refer to [How Vidoc works](/how-it-works#which-findings-vidoc-reports).
 ## Views
| Tab | Content |
| ----------------- | --------------------------------------------------- |
| **VIDOC curated** | Up to 10 open critical and high issues. Start here. |
| **By category** | Issues grouped by category, worst severity first. |
| **All issues** | All issues, with sort and pagination. |
## Filters and sort
Use **All repositories** to show the findings of one repository.
Click **Filter** to set these filters:
| Filter | Values |
| ----------------- | ------------------------------------------------------------------------------------------------------------------------------------------------------------------------------------------------------------- |
| **Risk type** | **All issues**, **Attack risk** (high and critical findings in attack categories), **Data & Compliance** (findings in compliance categories). Refer to [Security categories](/reference/security-categories). |
| **State** | **All**, **Open** (default), **Ignored**, **Closed**. |
| **Severity** | Critical, High, Medium, Low, Informative. |
| **Attack vector** | Network, Adjacent, Local, Physical. |
| **Search** | **Filter by path...** and **Filter by title...** |
In **All issues**, sort by **Severity (high first)**, **Severity (low first)**, **Newest**, or **Oldest**.
The page URL keeps your filters. Copy the URL to share a filtered view.
## Change status
You need the Developer role or higher.
1. Open the row menu (**⋮**) or the menu in the issue panel.
2. Select **Mark as**, then select a status:
* **Open**: the issue is active.
* **Ignored**: you accept the issue or decide not to fix it. Type a reason of 20 characters or more.
* **False positive**: the finding is not a real issue. Type a reason of 20 characters or more. Vidoc stores the finding as **Ignored** with your reason.
* **Closed**: the issue is fixed or closed.
3. Click **Confirm**.
When you give a reason for **Ignored** or **False positive**, Vidoc creates a learning. Later validations in the same repository use it. The learning shows on the [Memory](/web-app/memory) page with the source **Manual**. Write a specific reason, for example "The input is validated against an allowlist in `middleware/validate.ts`".
Scans also change the status automatically. For example, Vidoc closes a finding when a scan shows that the code no longer has the issue. Vidoc does not reopen an issue that a user set to Ignored or Closed. For the full lifecycle, refer to [How Vidoc works](/how-it-works#finding-lifecycle).
## Change severity
Select **Change severity**, then select **Critical**, **High**, **Medium**, **Low**, or **Informative**. You need the Admin or Security Engineer role.
## Bulk actions
1. Select the checkboxes of the rows. The header checkbox selects all rows on the current page.
2. Click **Actions**.
3. Select **Mark as** or **Change severity**.
One reason applies to all selected issues.
## Issue panel
Click an issue to open its panel. The same panel opens from **Findings**, from a [repository page](/web-app/repositories#repository-page), and from a [pull request](/web-app/pull-requests).
The panel shows:
* Severity, status, and CWE.
* **Description**.
* The code snippet, with a link to the file on the source code platform. From a pull request, the panel shows the PR diff.
* **Validation Results**: the verdict and the reasoning of the validation agent.
* **Technical Details**: the issue ID and the dates.
Panel actions:
| Action | What it does |
| ---------------------- | -------------------------------------------------------------------------------------------------------------------------------------- |
| **Resolve** | Sets the status to **Closed**. |
| **Export to AI agent** | Copies a fix prompt to the clipboard. Paste it into your AI coding assistant. The row menu has the same action as **Copy fix prompt**. |
| **New chat** | Opens [AI Chat](/web-app/ai-chat) with this issue attached. |
| **Add to chat** | Attaches the issue to the chat that is open now. |
You can also read and change findings with the REST API. Refer to [Issues API](/api/issues).
## Views
| Tab | Content |
| ----------------- | --------------------------------------------------- |
| **VIDOC curated** | Up to 10 open critical and high issues. Start here. |
| **By category** | Issues grouped by category, worst severity first. |
| **All issues** | All issues, with sort and pagination. |
## Filters and sort
Use **All repositories** to show the findings of one repository.
Click **Filter** to set these filters:
| Filter | Values |
| ----------------- | ------------------------------------------------------------------------------------------------------------------------------------------------------------------------------------------------------------- |
| **Risk type** | **All issues**, **Attack risk** (high and critical findings in attack categories), **Data & Compliance** (findings in compliance categories). Refer to [Security categories](/reference/security-categories). |
| **State** | **All**, **Open** (default), **Ignored**, **Closed**. |
| **Severity** | Critical, High, Medium, Low, Informative. |
| **Attack vector** | Network, Adjacent, Local, Physical. |
| **Search** | **Filter by path...** and **Filter by title...** |
In **All issues**, sort by **Severity (high first)**, **Severity (low first)**, **Newest**, or **Oldest**.
The page URL keeps your filters. Copy the URL to share a filtered view.
## Change status
You need the Developer role or higher.
1. Open the row menu (**⋮**) or the menu in the issue panel.
2. Select **Mark as**, then select a status:
* **Open**: the issue is active.
* **Ignored**: you accept the issue or decide not to fix it. Type a reason of 20 characters or more.
* **False positive**: the finding is not a real issue. Type a reason of 20 characters or more. Vidoc stores the finding as **Ignored** with your reason.
* **Closed**: the issue is fixed or closed.
3. Click **Confirm**.
When you give a reason for **Ignored** or **False positive**, Vidoc creates a learning. Later validations in the same repository use it. The learning shows on the [Memory](/web-app/memory) page with the source **Manual**. Write a specific reason, for example "The input is validated against an allowlist in `middleware/validate.ts`".
Scans also change the status automatically. For example, Vidoc closes a finding when a scan shows that the code no longer has the issue. Vidoc does not reopen an issue that a user set to Ignored or Closed. For the full lifecycle, refer to [How Vidoc works](/how-it-works#finding-lifecycle).
## Change severity
Select **Change severity**, then select **Critical**, **High**, **Medium**, **Low**, or **Informative**. You need the Admin or Security Engineer role.
## Bulk actions
1. Select the checkboxes of the rows. The header checkbox selects all rows on the current page.
2. Click **Actions**.
3. Select **Mark as** or **Change severity**.
One reason applies to all selected issues.
## Issue panel
Click an issue to open its panel. The same panel opens from **Findings**, from a [repository page](/web-app/repositories#repository-page), and from a [pull request](/web-app/pull-requests).
The panel shows:
* Severity, status, and CWE.
* **Description**.
* The code snippet, with a link to the file on the source code platform. From a pull request, the panel shows the PR diff.
* **Validation Results**: the verdict and the reasoning of the validation agent.
* **Technical Details**: the issue ID and the dates.
Panel actions:
| Action | What it does |
| ---------------------- | -------------------------------------------------------------------------------------------------------------------------------------- |
| **Resolve** | Sets the status to **Closed**. |
| **Export to AI agent** | Copies a fix prompt to the clipboard. Paste it into your AI coding assistant. The row menu has the same action as **Copy fix prompt**. |
| **New chat** | Opens [AI Chat](/web-app/ai-chat) with this issue attached. |
| **Add to chat** | Attaches the issue to the chat that is open now. |
You can also read and change findings with the REST API. Refer to [Issues API](/api/issues).